

Introduction
A few weeks ago, I pulled the trigger and sold my Samyang 85mm f/1.4 AE lens and Nikon F80 to clear some space (and money) for a new camera. I ended up buying a Fuji GS645s via Bellamy Hunt, a.k.a. JapanCameraHunter (JCH)! About my experiences doing business with JCH, I will tell you it was a pleasant experience. Via his website you can send him a request for a camera that you are looking for and for what budget. Over e-mail we discussed the options and came to a deal. From my initial inquiry to the moment of delivery required no more than 14 days. That includes international shipping using the express mail service (EMS) and customs clearance. I will not discuss his cut here, but I believe his fees are very reasonable, especially when you consider the quality of the item, the quick delivery and fast replies to e-mails. If you are in the market for a film camera, definitely consider doing business with JCH.
Now, back to the camera. Why the Fuji GS645s in the first place? I love shooting 120 film and already own a Zenza Bronica ETRS system. Although it is a great camera to shoot with, it isn’t exactly small or light at a hefty 1860 g with the 75 mm lens, prism finder and the speed grip mounted (the configuration I typically use). It feels more at home in a studio setting or on a tripod, rather than out on the streets. For roaming about here in the Netherlands or on holidays, I prefer something smaller and lighter. Initially I was in the market for a Fuji GS645 Professional; a folding 645 camera system. Unfortunately those are very hard to find in working condition and even the ones you will find all suffer from the same design flaws. The biggest drawback of the GS645 Pro is the material Fuji used for the bellows, which is prone to developing pinholes. This is a flaw that can only be fixed by replacing the bellows and unless the camera has an official record of servicing by Fuji or had custom bellows installed, this is a no-go for me. The second flaw of this camera is in the folding mechanism: the camera can only be folded when the lens is focused to infinity; failing to do so will cause the shutter strut to flex and eventually break or jam.
The next option in line is the Fuji GS645s; a medium format, fixed lens coupled rangefinder camera that superseded the folding Professional. In this generation, Fuji dropped the folding mechanism and replaced it by a fixed lens that is protected by a roll-bar. As Bellamy put it: this camera is such a beast it needs a cage! And a beast it is indeed. At 860 g, it is considerably lighter than the ETRS and it is also considerably smaller. Nevertheless, being a medium format camera, it isn’t exactly small either. Read on for my impressions.
Impressions after one roll
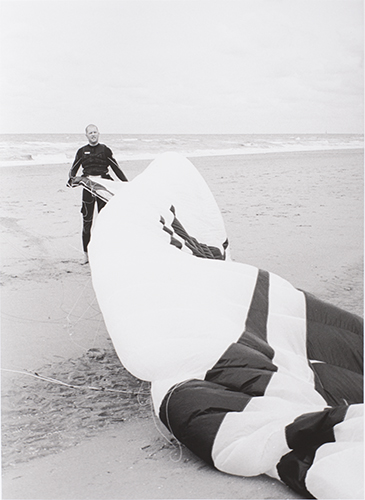
Bellamy did a great job at sourcing this camera for me. It is completely functional and both mechanically as well as aesthetically in perfect condition. There is a small scratch mark on the back, but for the rest it is spotless as can be seen in the pictures below.
My first impressions are those of someone that needs to get used to a new system. After inserting the batteries, I picked up the camera to find it sits reasonably well in the hand and after a bit of playing around I found a way in which my hand wraps comfortably around the camera and keeps the shutter within easy reach. The shutter release button is on the top of the camera and is not angled to the front as in most modern cameras (or the ETRS). With a camera this size I needed to get used to reaching for the shutter and having my hand high up the camera. Some of the outer parts of the camera are made of plastic, but overall it feels solid. The viewfinder is bright, but the rangefinder spot appears a bit dim to me; perhaps that just takes a bit of getting used to. The same goes for the light meter indicator lights. I shot most of the first roll outside on an overcast day and the indicator lights disappeared into the background.
As the camera has no mirror flapping up with each frame, it is very quiet compared to my other cameras. The leaf shutter produces the sound of a released spring. I am not ready to fully trust the built in light meter just yet. My first roll seemed a bit overexposed. For the next roll I will compare the reading from the camera with a hand held incident meter and see if it is bad practice from my side or poor metering from the camera.
The camera manual has this to say about the light meter
“Your camera is equipped with a GPD light-metering photo-cell in the viewfinder. lt measures the light which is reflected by a semi-transparent mirror after it enters the viewfinder’s objective lens. lt is highly effective against diagonal back lighting and does not require exposure compensation when taking diagonally back lighted portraits, etc. However, it must be shielded in directly backlighted and brightly top lighted situations.”
To me this sounds like a bit of both. Most of the photos on the first roll were shot on the beach with top lighting. Below is the most interesting picture on the first roll. For a fair comparison I stuck to my regular development procedure. Room temperature was high and I had to do the development at 24 C. The roll was therefore developed in D-76 at 1:1 dilution for 7 minutes and 45 seconds with inversions every 30 seconds. This working print is an enlargement of the bottom right quarter of the full frame. It looks nice and sharp.
The next thing I will have to do is find myself (or make myself) a nice camera strap to go with the camera. If I still feel that the rangefinder is too dim to work with, getting to work with a small bit of tape is the second thing to do. By applying a small piece of black tape on the viewfinder, the camera all of a sudden has a contrasty split screen finder; a method many attest works.
Overall my initial impressions are good and I look forward to unleashing this beast more often!
Impressions after 10 rolls
As this camera will be likely be my photographic companion for the time to come, I intend on updating this article after 10 rolls of film. At the current rate this will take me about 10 – 20 weeks. Come back later! If you are interested in hearing more, subscribe to my facebook page or twitter feed to be alerted when this update is published.
Update: 31 March 2016
I finally managed to shoot 10 rolls of film with this bad boy on a business trip to San Jose, CA, USA and a well needed three week holiday to Vietnam. I have to say: I love this camera. In the beginning, I was a bit hesitant and unsure about the ergonomics and the viewfinder brightness. After a few more rolls, I got used to the ergonomics and have found a way to hold it comfortably that works for me and keeps my thumb at the crank and index finger close to the trigger.
The roll bar, or cage, that protects the shutter mechanism actually serves two other purposes. First, it gives some guidance on where to keep your fingers when taking a photo. As this is a rangefinder and not looking through the lens, you don’t get to see if your hands are in the frame. By bracing the fingers against the cage, you can be sure that they are not going to be. I am not sure whether this was the intentions of the Fuji engineers, but I find it a nice extra anyway. Bracing your fingers against the cage has a second advantage: it improves the total ergonomics of the camera, too!
Both in the US and in Vietnam, I ended up doing street photography with this camera most of the time. With its 60 mm focal length lens (roughly equivalent to 35 mm on a 135 camera), it seems to cater to this kind of photography anyway.
I still find the viewfinder to be too dim to use under various lighting conditions. When I really need it, it can require a bit of extra will power to nail focus and slow me down considerably. However, I found myself often either focusing at infinity or using zone focusing for many of my shots.
The excerpt of the manual on the light meter performance (see above) is accurate. The light meter performs reasonably well and results in well exposed frames 90% of the time. When there is a strong light source in the frame, the light meter is easily fooled. You have to admit, though, that this is challenging for any light meter. As I already discussed above, the exposure indicator lights can be hard to see. If you move your eye in front of the eye piece, however, you will find that there is actually a black strip behind these lights that makes them significantly easier to see. Even in very bright conditions, it makes the exposure indicators easy to use. You just need to know where to put your eye in front of the eye piece.
So, what is there to miss? The maximum ISO setting on the camera is 1600. A setting for ISO 3200 would have been nice, as well as some basic EV corrections. The maximum shutter speed is limited to 1/500 s, which is typical for leaf shutters, but sometimes too slow for shooting during the day. Even with ISO 125 film such as, e.g., Ilford FP4+, the sunny 16 rule tells us that we would need 1/125 s at f/16. With a fastest shutter speed of 1/500 s this only allows you to open up the aperture to f/8.
I find the optics to be very sharp and am pleased with the overall picture quality. The focusing mechanism runs smooth, and the shutter speed and aperture dials are of the right size. The ISO slider is tiny though and setting it really requires some of the other dials out of the way.
Overall, I find this camera a joy to use and it works very nicely as a street photography/documentary journalism kit.
You must be logged in to post a comment.